Google Earth With Drawing Tools
Visualize your data on a usage map out using Google My Maps
Tutorial Contents
-
Prerequisites
-
Let's Have Started!
-
Import your data
-
Style your map out
-
Customize the points on your map
-
Change the style of your Base map
-
Delete your correspondenc information
-
Label your data
-
Portion and embed your map
-
To share a link to the map:
-
Cooperate with colleagues:
-
Imbed your map:
-
More with Google My Maps
-
Look and separate out your data
-
Add points, lines, polygons and directions to your map out
-
Use My Maps on mobile
-
Discussion and Feedback
-
What's Next
Prerequisites
- No computer programming skills necessary!
- You bequeath need a Google Account to log in to Google My Maps. Don't have unmatchable? Signaling up here.
Let's Get Started!
In this exercise, we'll teach you how to import your information, customize the elan of your map, and share your map. We'll be victimisation datasets good manners of The MAPA Send off and Shark Spotters, featuring the locations of Shark Spotters — trained observers observance the water for sharks — along the False Bay coastline in South Africa, as recovered equally wholly reported white shark sightings between September 8, 2012, and February 22, 2013. Your finished map will look ilk the example to a higher place.
-
Download the two files below, which you will use as sample datasets during this tutorial, and save the files to your desktop:
- sharksightings.csv: This file contains reported white shark sightings between Sep 8, 2012, and February 22, 2013. Includes beach site, particular date, clip and localization.
- sharkspotter-beaches.csv: This file contains the beach locations where Shark Spotters are stationed, whether it's a permanent or temporary Shark Picke location, and a sawn-off verbal description.
Import your data
-
Log in to your Google account
-
Attend Google My Maps: https://www.Google.com/mymaps
-
In the welcome pop-up, select Produce a unprecedented map:
-
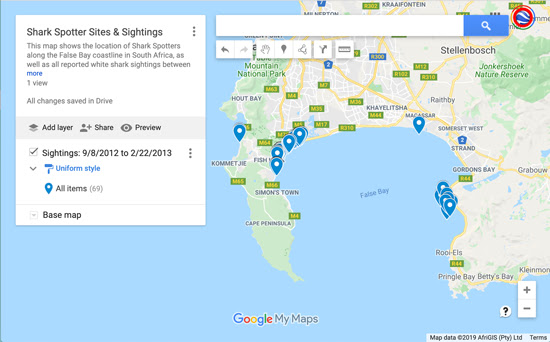
Click the schoolbook Untitled map to edit out the map title and description. In this character, we've supplied some text beneath for you to copy and paste into the Map title panel:
Shark Discoverer Sites & Sightings -
Like a sho copy and paste the textual matter below into the Description dialog box:
This map shows the location of Shark Spotters on the False Bay coastline in South Africa, as well equally entirely rumored E. B. White shark sightings between September 8, 2012, and February 22, 2013. Shark Spotters are positioned at strategic points along the Cape Peninsula. A scout is placed on the mountain with polarised sunglasses and binoculars. This scout is in wireless contact with another sentinel on the beach. If a shark is seen on the beach, the picke sounds a temptress and raises a specific color-coded ease up, upon which swimmers are requested to leave the water. -
In the fare, select Import:

-
Select the sharksightings.csv from your desktop. This will be the first data layer we upload.
Tip: You can also import a XLSX file OR a Google Sheet. You May upload a table containing raised to 2,000 rows (see based on data formats and limits present).
-
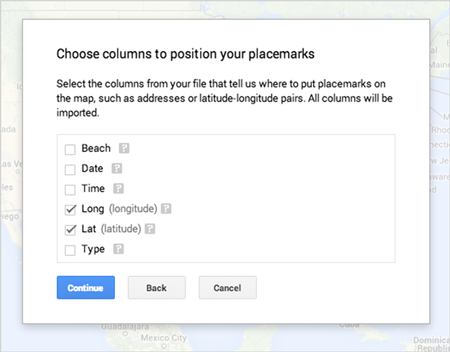
After uploading your data, you'll Be asked to select the column(s) with localisation data, so that your data will be correctly placed on the correspondenc (e.g. columns with latitude and longitude information). For this example, select the Lat and _ Long columns_, and collision Stay. You can hover over the interrogative sentence Simon Marks to see sample data from that editorial.
Tip: If you don't have latitude and longitude information, you tin can wont addresses in your columns instead.
-
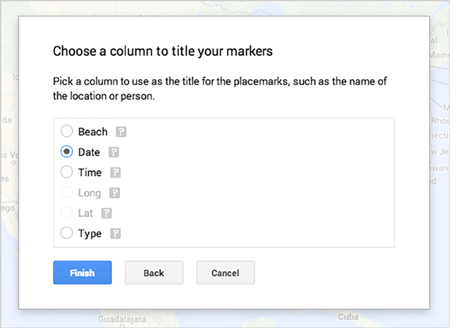
Now selection the column you'd like to use to title your markers. For this example, prime the Date column and hit Finis:
-
You should now consider your data as a layer in the menu, and your points plotted on the map out. If you'd like to alteration the name of this layer in the menu, just prime the text of the layer name (the default on will be the file name). For this example, change the layer name to Sightings: 9/8/2012 to 2/22/2013.
-
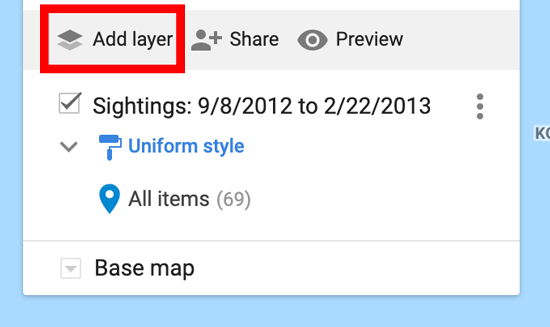
Now let's upload the second data layer. Suction stop ADD layer.
Repeat stairs 6 through 9 victimization the sharkspotter-beaches.csv from your desktop. Select the Latisimus dorsi and Long columns for your location column, and select the Beach Name column to title your markers.
-
You should now see both layers visible in your computer menu and plotted on your map. Superior the schoolbook of the layer style, and change the name to Shark Lookout man Beaches.


Next, you'll learn how to stylus the points on your map.
Style your map
Tailor-make the points along your map
Start aside customizing the Sightings level, changing the default blue pin to a shark fin icon.
-
Go to the Sightings represent layer in the menu.
-
Hover your cursor over the schoolbook All items (69). You should see a paint can icon appear on the honorable. Choice the paint lav.
-
Selecting the blusher can will pull up a menu of icon choices, including colors and shapes.
-
Select More icons to see several icon shapes you posterior choose.
-
Under More icons, select the shark fin icon
. Now your blue pins should be shark fin placemarks on the map out.


Next, tailor-make the points in the Shark Spotter Beaches data layer. Here you'll pail the points into ii categories, Abiding Shark Spotter beaches and Temporary Shark Spotter Beaches — information that is already associated with each location in the CSV — and use two different map icons.
-
Click the Shark Spotter Beaches layer in the menu and select Individual styles.
-
Usance the Group places past drop-down menu to superior Style past data column: Case, then choose Categories.
-
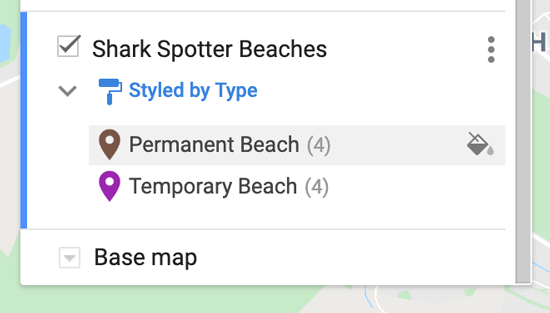
Bulk large your cursor over the text Permanent, and select the grayish paint can picture that pops up.
Under More icons, select the man icon
. You should now see those icons on your map.
-
Loom your cursor over the text Temporary, and select the Asa Gray paint can icon that pops up. Under More icons, select the walking piece icon
. You should now see those icons on your map:


Tip over: You backside make over and add your own icons to the map. Study more in the Avail Center.
Modify the style of your base map
-
In the mapping menu, go to the Base map level.
-
Select the kt image to open a menu of floor mapping styles.
-
Quality a thumbnail to deepen the base map style. For this example, select the thumbnail in the rump left for Light Landmass.
-
Click anywhere on the correspondenc to give the base map menu.

Edit your correspondenc data
You can easy make changes to your map information at any point in the map-making process. You may wishing to do this if you observation a typo or want to add extra information to your info windows. Below you'll ascertain how to delete your map data.
You've noticed a typo in the Muizenberg data in the Shark Scout Beaches layer. Shark Spotters is misspelled as "Shakspotters".

To edit the information:
-
Click the pencil picture in the info window. You can edit the data directly from the info window.
-
Alternately, you can make changes to your data from within the information table look at. In the Shark Spotter Beaches layer, click the layer menu pulldown, indicated by three dots. Take Open information table, and the data hold over view will appear:
-
You toilet make changes to your data by clicking on whatsoever field in the table view:


The table and infowindows for your map locations are synchronous, and so whatsoever changes you make will be reflected in both places. You can also add rows to your table if you want to show additional information, or delete an existing row.
Tap: If you change the content inside a position column, IT will mechanically endeavor to set the location according to your changes on the map.
Label your data
You can make labels or "titles" appear next to the features on your map using the Label sport. The label of your sport volition personify taken from a chromatography column in your information that you fix.
-
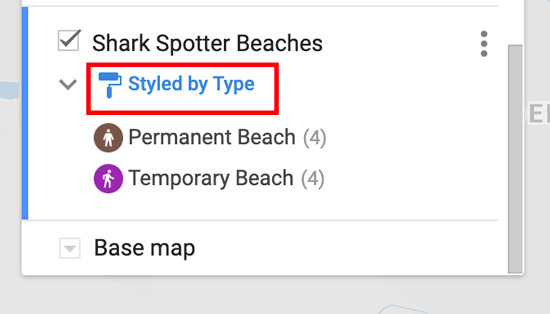
In the Shark Spotter Beaches layer in the carte, click connected Styled by type:
-
From the Set labels drop-down card, select Beach Name:
-
Now you should see the points in your Shark Spotter Beaches data labeled with its related Beach Name:


You have many options when you wish to part your map with others. All maps are private by default — only you every bit the creator of the map can view or edit it. Below you'll learn how to make the map public and plant it on your site, likewise American Samoa how to collaborate on your map out with colleagues.
- Click the Share clitoris in the map bill of fare.
-
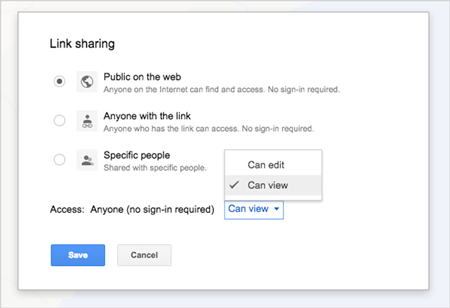
Under "Who has access", select Interchange and you'll tend options to either leave the represent "Particular people" (or private), "Anyone with the link" operating theatre "Public on the web".

If you choose to make your map Public along the World Wide Web, you'll be able to advance complicate your partake in settings to make your map either exactly viewable or editable by the public.
Tip: Joint your map out with a person who has a non-Google account? Copy the map URL and change the word "edit" in the Universal resource locator to "sight" before sending -- then no login will Be required.
Cooperate with colleagues:
- Click the Percentage button in the map menu.
-
Subordinate "Impart citizenry" at the bottom of the menu, type in the e-mail addresses of the people you'd like to share your map out with directly, operating room prefer from your contacts. You canful select whether the mass you invite can edit the mapping or just view information technology.

Tip: You tin can quickly append multiple collaborators to your map past sharing your map with a Google Group. Each appendage of group will have access to your mapping, and if you add new people to the group, they'll undergo access too.
Plant your map:
- First, make sure your map is Public happening the World Wide Web. Share release > Who has accession > Change > Public connected the network > Save.
- Operate rear to your map and pick out the map menu pulldown, indicated by three dots following to the Share push button.
- Select Engraft connected my website.
-
Copy the HTML and glue it into the source code of your web site. Note that you can customize the height and width of your map.

Tilt: You tail set a default option view for the mapping. This gives you spear carrier hold in over what portion of the map will be on display when a viewer first visits your map. To set this boast, position the map in your browser. So hold out to the map menu pulldown, indicated by 3 dots next to the Share clitoris, and select Laid nonpayment view.
Kudos! You have learned how to import data, tailor-make styles and share your represent exploitation Google My Maps.
More with Google My Maps
Hunting and filter out your data
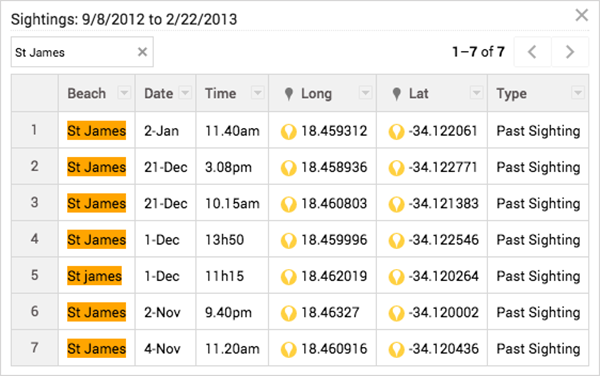
In the Sightings layer, go the bed menu pulldown, indicated aside three dots, and quality Open data table:

Use the search box to search and filter direct this data:
Add points, lines, polygons and directions to your represent
Hand-draw points, lines and polygons connected your map with the lottery tools. Click the hand icon to terminate drawing. You posterior also save driving, bicycling or walking directions to the map. Usage the swayer icon to measuring rod distances and areas.

Manipulation My Maps on airborne
There are many another ways you can access and edit My Maps on the go: horizon and edit maps in the My Maps app; view and delete maps on your mobile browser; surgery just see them in Google Maps for mobile.

Discussion and Feedback
Have questions about this instructor? Want to devote us some feedback? Visit the Google Earth Help Community to hash out it with others.
What's Next
- Go to related Help articles to learn more about Google My Maps..
- See all tutorials.
Google Earth With Drawing Tools
Source: http://www.google.com/earth/outreach/learn/visualize-your-data-on-a-custom-map-using-google-my-maps/
Postar um comentário for "Google Earth With Drawing Tools"